Showing posts with label ribbon. Show all posts

Sunday, September 19, 2010

Ribbon Organization!!

I LOVE ribbon. I have yet to meet a ribbon I didn't like. I have hundreds of them and they have always been a challenge for me to store.

I used to store most of my ribbons in little tiny Cropper Hopper embellishment boxes stored in a larger blue case. I arranged them according to color and that worked well for a while. Well, until I got up to 5 boxes. LOL

I needed a new system and pronto. I had been eyeing and debating the Ribbon Ring for a while and finally decided to take the plunge and order it.

I was EXTREMELY surprised that it arrived the very next day!! Granted, it wasn't going very far, but STILL!! The NEXT day? That's crazy fast!! I immediately got to work putting my ribbons on the tabs. It took me several days to get it all done (not working continuously! LOL), but it was worth it! I grouped the tabs of ribbons on rings according to color and hung the rings on little Command hooks I stuck to the wall.  Now I can see all of my ribbons and finding one to match my project will be a lot faster and easier. I hope. :)

Soaring By To Say Hi Card

This card was so fast and simple to make!!

Everything (except the Autumn Leaves buttons and black Staz-On ink) is from Papertrey Ink. (I'm LOVING everything from there lately!!) The stamps are the "Everyday Button Bits." I stamped the balloons and sentiment on Kraft cardstock and cut them out with Nestabilities dies in my Cuttlebug. Stick on a few buttons, add a ribbon, and you're done!

Tuesday, November 3, 2009

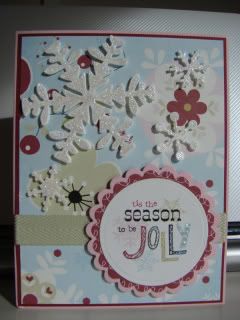
Jolly Christmas Card

I feel like I cheated with this card!

The sentiment and pattern papers were downloaded and printed from
http://www.pinkpetticoat.co.uk/. They are from their "Fairy Lights" collection. I used my Nestabilities in the Cuttlebug to cut the circles and scallops. The snowflakes are from two Cuttlebug dies, and they are covered with Star Dust Stickles and adhered with pop dots for dimension. The "jolly" in the sentiment was also made glittery by going over the letters with a Sakura Quickie Glue pen and sprinkling with loose glitter. The light green twill ribbon in from Martha Stewart.

Everyone uses pastel colors for Christmas cards, right?

Wednesday, April 15, 2009

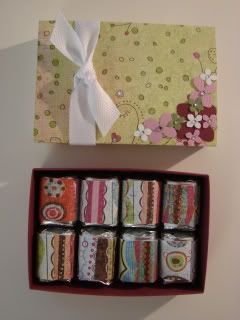
Nugget Box


Here is a little Nugget box that I made very quickly the other day. The cardstock is Bazzill and the patterned papers are from the Basic Grey "Phoebe" line. The flowers are hydrangea punches from Martha Stewart, and the twill ribbon is also Martha Stewart. The "bigger" rhinestones are 3mm Darice from J's and the smaller ones are 2mm nail gems I got off eBay.

The directions to make the box came from here:
http://www.scor-pal.com/basics/index_files/Page406.htm

Friday, January 9, 2009

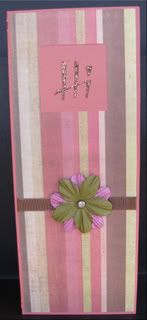
"Hi" Card

This is a fun little tri-fold card, although I'm not too crazy about the colors and how it turned out overall. The picture makes it look even worse! LOL

The card was cut from Bazzill cardstock with the Wild Card cart at 9". It fits into a #10 letter size envelope. The phrase was cut from brown Bazzill and colored in with Cinnamon Stickles. The printed paper is from the My Mind's Eye Signature Suite pad (I told you I love it! LOL). The ribbon is American Crafts, the flowers are Prima, and the little rhinestone is 5mm and made by Darice.

Thursday, January 8, 2009

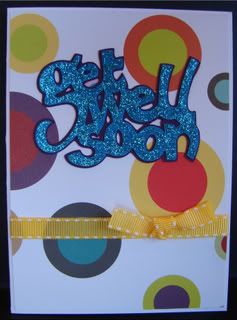
"Get Well Soon" Card

Yeah, I know it's bright!

White A2 base from M's value pack. The printed paper is American Crafts, from M's. The ribbon is from M's, too. The phrase was cut at 2" from Bazzill cardstock with the Beyond Birthdays cart and colored in with Turquoise Stickles.

Easy, easy, easy!

"Thinking of You" Card


Here is a card that I have made before. Does that mean I have scraplifted myself? LOL

The card is 4" x 5.5" and fits into an A2 envelope. The white base is from one of the "value packs" from M's. The black and white paper is from J's open stock. The "Thinking of You" was cut from DCWV cardstock with the Alphalicious cart at 1.75" using the short stack feature and colored in with Stardust Stickles.. The ribbon is from M's, as are the flowers and rhinestones. The flowers are actually Bride's table confetti from the wedding aisle.

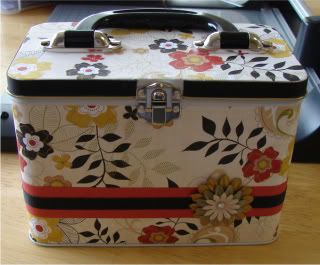
Grandma's Tin


Grandma's don't need a thing at Christmas, especially my husband's grandmother.  She doesn't want more knick-knacks.  She doesn't want candy or a Hickory Farms gift basket.  She doesn't want you to buy her anything.  So I decided to make her something!

I picked up this ProvoCraft tin at Michael's and slapped that fab flower paper on it.  The paper is Bo Bunny and I got it at Craft Warehouse.  I used Mod Podge to adhere the paper to the tin.  (I'll save the story about the template for another time.)  The red strip is just Bazzill cardstock and the black is a ribbon, which is also around the edge of the lid.  A couple of Prima flowers with a rhinestone in the middle finish it off. Voila!  (I don't know how to make accents!  LOL)  The tin is finished.

I filled the tin with assorted all occasion cards.  She seemed to like them.  I guess this is the gift for the stubborn old woman who has everything.  (I love you, grandma!!)

Friday, October 24, 2008

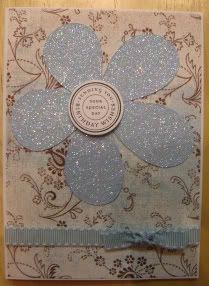
Glitter Flower Birthday Card

Here is another super easy card I made for the Cards For Soldiers.  Again, standard A2 size.  The patterned paper is from a My Mind's Eye stack I got at Costco last year.  The flower was cut out of light blue Bazzill at 3.5" (blackout) using my Cricut machine with the beloved George cart.  I used Mod Podge applied with one of those foam brushes to cover the flower and then covered it with Crystal Ultrafine Transparent glitter from Art Institute.  (I would normally use my Xyron when applying loose glitter, but I was making 24 flowers total and was too cheap to buy more refills!  LOL)  The stamp is from the Stampin' Up set "Circle of Friendship" stamped on white cardstock and punched out with a circle punch.  The ribbon is from M's.  I used a pop dot to attach the sentiment to the flower.  Can't get much simpler than this!!