Sunday, January 16, 2011

Post It Note Holder


This was a fun and easy little holder to make! It is not my original idea, but I can't remember where I got the instructions from. This holder will hold a 3x3" Post It pad.

The main piece is a piece of cardstock 3 1/16" x 9", scored at 3", 3 3/8", 6 1/2", and 6 7/8". I then used a Fiskars border punch on the end piece for the scalloped edge. If you wish to have a straight edge, cut the cardstock to 3 1/16" x 8 1/2" and make the score marks the same as before.

The front cover pieces are 2 3/4" x 2 3/4" (I used red), and 2 1/2" x 2 1/2" (patterned). Cut 2 of each if you want to cover the back as well. The flap pieces are 1 3/8" x 2 3/4" (red) and 1 1/8" x 2 1/2" (patterned). The flap is held down with a velcro circle.

The flowers on mine were made using Papertey Ink's Beautiful Blooms II #1 dies in my Cuttlebug. All cardstock is Papertrey Ink, except the yellow which is Bazzil. The patterned paper is Bo Bunny, and the brad is Recollections.

"Hi There" Ladybug Card


Yay! It's scraplift time! LOL


My inspiration for this card came from HERE. Eerily similar, aren't they?


The card is standard A2 size and I rounded the right side corners with my new We R Memory Keepers Corner Chomper. All of the cardstock is from Papertrey Ink, except the black, which is DCWV. The ladybug was cut at 2.5" with the Cricut using the Walk In My Garden cartridge. The background paper is from the My Mind's Eye Simply Delightful stack, and the velvety red and pink dotted paper is from a Michael's clearance sale a few years ago - the maker is unknown.


The sentiment is from Papertrey Ink's Mega Mixed Messages set and was stamped with VersaMagic chalk ink Hint of Pesto. 


The circle and scalloped circle were cut in the Cuttlebug with Nestabilities.  The pink scalloped border was punched using the Fiskars Threading Water punch.


Super easy and versatile enough for lots of different occasions!

Sunday, September 19, 2010

Embossed Flowers Thank You Card

If you tilt your head just a bit, the card will be straight! LOL OK, so my picture taking ability stinks.

I can't even begin to express how simple and easy this card was!! The "white" embossed piece is Core'dinations Whitewash cardstock with a lavender core. I embossed it with the "Elegant Bouquet" embossing folder from Stampin Up in my Cuttlebug. I sanded the embossing until the core color showed.

The sentiment is from Papertrey Ink's "Signature Greetings" and was stamped in purple ink and heat embossed, then cut using a Nestabilities die in my Cuttlebug. A few clear rhinestones in the center of the flowers finish it off.

You can use this base for soooo many different kinds of cards - just change the colors and sentiment to suit your occassion!

Ribbon Organization!!

I LOVE ribbon. I have yet to meet a ribbon I didn't like. I have hundreds of them and they have always been a challenge for me to store.

I used to store most of my ribbons in little tiny Cropper Hopper embellishment boxes stored in a larger blue case. I arranged them according to color and that worked well for a while. Well, until I got up to 5 boxes. LOL

I needed a new system and pronto. I had been eyeing and debating the Ribbon Ring for a while and finally decided to take the plunge and order it.

I was EXTREMELY surprised that it arrived the very next day!! Granted, it wasn't going very far, but STILL!! The NEXT day? That's crazy fast!! I immediately got to work putting my ribbons on the tabs. It took me several days to get it all done (not working continuously! LOL), but it was worth it! I grouped the tabs of ribbons on rings according to color and hung the rings on little Command hooks I stuck to the wall.  Now I can see all of my ribbons and finding one to match my project will be a lot faster and easier. I hope. :)

Hot Air Ballon Thank You Card

This card was so fun to make!!

Not only does Papertry Ink make super cute stamps, they also make dies to coordinate!!

The sun, balloon baskets, and sentiment are from the "Up, Up & Away" set. The sun comes in 3 pieces - the circle, and 2 rays so you can stamp in different colors if you want. The sun and baskets were stamped using VersaMagic chalk inks and the sentiment was stamped using Stampin Up Whisper White Craft ink. (The best white ink I have found so far!!)

The clouds were cut from white felt using the coordinating dies in my Cuttlebug, and the balloons were cut from Basic Grey "Kioshi" papers. The cardstock is Papertrey Ink.


Soaring By To Say Hi Card

This card was so fast and simple to make!!

Everything (except the Autumn Leaves buttons and black Staz-On ink) is from Papertrey Ink. (I'm LOVING everything from there lately!!) The stamps are the "Everyday Button Bits." I stamped the balloons and sentiment on Kraft cardstock and cut them out with Nestabilities dies in my Cuttlebug. Stick on a few buttons, add a ribbon, and you're done!

Wednesday, August 25, 2010

New Scrap Room

OK, so it's not really *that* new since we moved over 7 months ago, but I haven't posted any pics yet, so it's new to you!

My little getaway is in our daylight basement. I think the previous owners used it as an office. It was painted white - booooooring! The room has no windows so I painted it a bright, sunshine yellow.

Here is a view outside the glass doors looking in:


And a view just inside the doors. No, that is not my stripper practice pole!!


Here are my Jetmax cubes that hold all sorts of various items. The little door in the middle of the wall goes to the crawl space of the house. The black is magnet sheets and I store my Nestabilities dies on them. (You can kind of see my button fetish in the upper right corner.)


This IKEA bookshelf holds my Stampin Up stamp sets and my Cricut cartridges. I have a lot more carts than the ones shown, but most of them have been at my mom's house since I got my Gypsy.


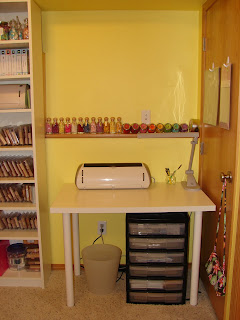
This is my cutting table where I keep my Expression. The door goes to some sort of pump thing that *may* need to be accessed in an emergency, hence the plain IKEA table. The built in ledge makes a perfect place to store some of my Prima flowers. (The black drawer thing underneath holds misc. stuff. Nothing interesting really.)


This is the other corner of the room that shows the placement of my desk. The door goes to a deep closet that is VERY messy right now!!


Here is my desk. I got it at IKEA and I LOVE it!! The drawers hold A LOT of stuff and I like how deep the top is. The shelves above also came from IKEA and hold all sorts of things I like to keep close by.


I keep my cardstock and the papers I use the most in Jetmax cubes right by my desk for easy access.


And that's about it!! That's where all of my supplies live and collect dust. :)

UPDATE: I've made a couple of changes since this was posted. You can see them HERE on the Cricut MB.